
Hammock Chair Hanging Instructions
Warning!
Do not spin or swing in your hammock chair, as failure and injury may result. Regularly inspect all points of attachment or suspension, and discontinue use if wear is evident. Customer assumes all liability and risks resulting from use of the hammock chair.
Parts Included
1. Hammock chair with bar assembly & woven seat.
2. One 5/8″ x 4 1/4″ screw hook and one 2 1/2″ “S” hook.
How Much Chain Do You Need?
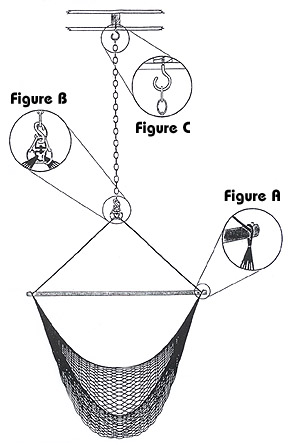
Use 3/16″ link #2 type chain (750 lb. test), available at most hardware stores. Measure from floor to support beam, and subtract 5′ 6″ to arrive chain length. (“S” hook should be about 6′ from floor, leaving about 6″of extra chain to loop under swivel, as shown in Figure B. Raise or lower as prefer, adjusting length of chain accordingly.
 Care
Care
- When hanging chair make sure loops and suspension arms are straight. They sometimes get twisted or tangled in transit or during washing (see Figure A).
- Washing – By Hand or machine. Remove seat from bar and tie the ends together to prevent tangling. Warm wash, cool rinse, hang to dry.
- Important: Periodically inspect all points of suspension and attachment (detailed areas in drawing) for signs of wear. Discontinue use if unusual wear or fraying is evident. Inspect swivel attachment (Figure B) for wear. Gap between swivel components should be no more than 3/16″. For extra safety, loop extra chain underneath swivel and hook on to lower’ end of “S” hook, as shown in Figure B.
How To Hang
Exposed Wooden Beams
(ceiling, patio cover, or gazebo)
- If your beams are exposed, you’re almost done!
- Simply install the hook into the center of the beam all the way until only the curved part of the hook is exposed.
- Hang chain from hook and suspend chair from chain using “S” hook, leaving about 6″ of chain hanging free.
- Loop free end of chain under swivel, and attach to lower end of “S” hook, as shown in Figure B.
Hidden Wooden Beams Or Rafters
(ceilings and porches)
- Locate hidden beams. They are commonly spaced 16″ apart. One way to locate them is by tapping lightly on the ceiling, listening for the difference between a hollow sound (no beam) and a solid, sharper sound (beam). Don’t get discouraged, they’re up there.
- To make sure you’re on a beam, hammer a small nail at the spot (you’ll hit something solid if you’re on the beam).
- To locate center of beam, hammer second nail to left or right of the first one. Drill and install as in previous paragraph.
Cement Or Adobe Ceiling
- Drill at a slight angle into cement or adobe with masonry bit.
- Apply adhesive mixture into hole.
- Insert lead plug, tapping lightly with hammer.
- Screw straight hook (included) into lead plug. Allow adhesive to cure.